
Italian Pizzelles

Baking Christmas cookies is a tradition that I learned at a very early age from my Grandma and mom. Every Christmas, my mom and Grandma would get their mixers together and just crank out trays and trays of delicious holiday cookies. Italian wedding cookies, pignolis and Italian Pizzelles were three of the cookies that my Grandma would always make. I’d always be a good helper by eating the broken ones … and sometimes had to break a few extra just because. While this holiday season may feel different this year, these Italian Pizzelles taste just as delicious as when my Grandma would make them.
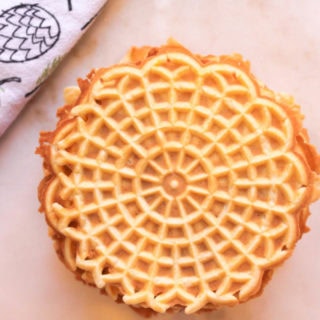
Pizzelle comes from the Italian word for ’round’ and ‘flat’ and the ending ‘elle’ means small. So basically these cookies are small, round, flat crispy waffles. And they are delicious. The only tricky thing about making these cookies is that you need a Pizzelle maker. These are extra special to me because I have one of the Pizzelle makers handed down from my Grandma. It’s still in it’s original box with her handwriting on the outside of the box that says “This is the one we use.” My mom said her Grandma used a hand-held maker that she would hold over the gas stove when she used to make them.
 This is the closest one to the exact one that I have (same brand) but have not found any in-stock anywhere. Cuisinart makes one, and I added a few similar ones to my Amazon storefront if you’re interested in making these. As of today, this little one from Dash actually has good reviews and is the only one I found that is in stock. The trick about the Pizzelle maker is that you have a few seconds between undercooked, perfect, and burnt. I timed these very specifically this year and found that 25 seconds for the size using the small cookie scoop was perfect. Anise extract is not something people usually have on hand, but I definitely recommend adding it to this recipe if you have it. It gives the cookies a nice licorice taste that is very distinct and refreshing.
This year was the sixth annual The Salted Cookie Holiday Cookie Swap, which felt better than ever given the craziness of 2020. Like many, I’ve been craving anything normal in these abnormal times, and rather than try some fancy new cookie, I decided to bake up a large batch of these Italian Pizzelles. I had my friend Rita in this year’s swap, and knew that these cookies would hold up on the short journey from Boston to Norfolk. She made the best video of receiving the package and biting into these crispy cookies. If you search #thesaltedcookieholidayswap on Instagram you can see some good cookie content from this year’s swap and years past. 
So if you’re looking to add a new, easy and delicious cookie to your holiday trays, bake up a batch of these nostalgic and delicious Italian Pizzelles.
Italian Pizzelles
A light and crisp cookie that is perfect for your holiday cookie trays. They can be enjoyed plain, lightly sprinkled with powdered sugar or even rolled when they are still warm and filled with your favorite filling.
Ingredients
- 1/2 cup butter, melted and cooled
- 3 eggs
- 3/4 cups granulated sugar
- 1 teaspoon vanilla extract
- 1/2 teaspoon anise extract (optional)
- 1 3/4 cup all-purpose flour
- 2 teaspoons baking powder
- Non-stick spray for the iron
Instructions
Note: You will need a Pizzelle Press to make these cookies.
- Melt the butter and set aside to cool. Plug in and heat up your Pizzelle maker. I put some foil underneath mine to catch any of the batter that drips out.
- In a large mixing bowl, beat together the eggs and sugar. Slowly add in the cooled melted butter, vanilla and anise. You can leave out the anise if you don't have it and add extra vanilla.
- Sift the flour and baking soda together, and slowly mix the dry ingredients into the wet batter until they are incorporated. The batter will be stiff enough to be dropped by a spoon. The batter can be refrigerated to be used at a later time.
- Open the Pizzelle press, lightly spritz the top and the bottom with non-stick spray. Use a small cookie scoop, or a teaspoon and drop the batter right in the middle of the press. Clamp the press down and hold it for 25-30 seconds. The cookies are done when they are lightly golden around the edges. Use a spatula to lift the cookie onto a cooling rack.
- Repeat this with the remaining dough. You should have between 25-30 cookies at the end. Enjoy!


Love your cookies! Can pizzelles be made dairy free? Our granddaughter, Livie, is allergic ;-(….
Normally I would say applesauce but that doesnt work for crispy cookies. Maybe try coconut oil? This article had a few good ideas: https://www.thekitchn.com/butter-substitute-baking-23023173